User Guide
×

Features

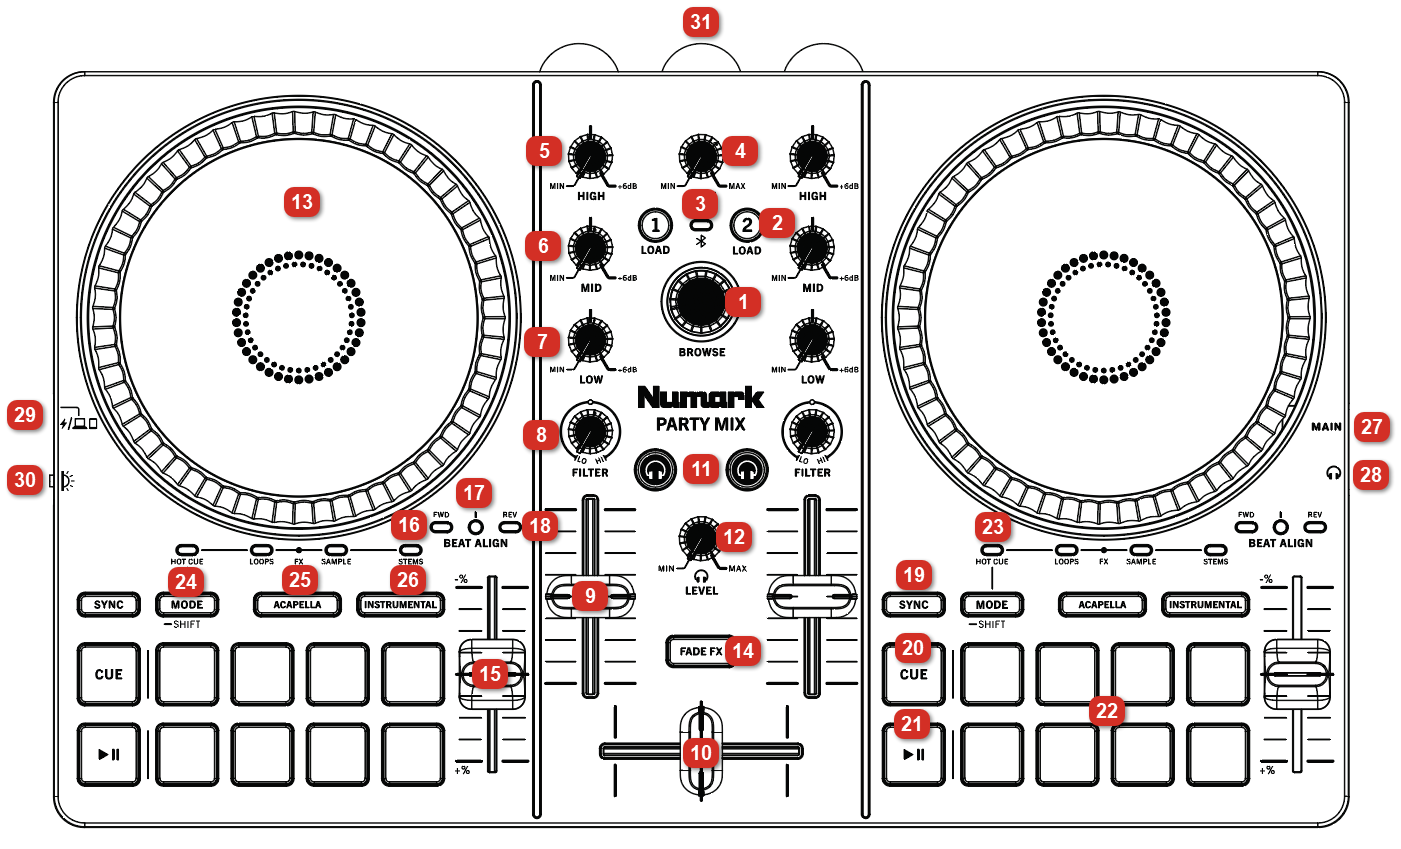
Click on a numbered control below to jump to that section.


Features
1

Browse Knob

 
Rotate this knob to cycle through crates and tracks. Press it to move forward in the software panels.
 
2

Load

 
Press one of these buttons while a track is selected to assign it to Deck 1 or 2, respectively, in the software. Press these buttons twice to perform an "instant double", automatically loading the selected track on one deck to the opposite deck.
 
3

Bluetooth Indicator

 
This LED indicates Bluetooth pairing and connected status. The unit is always in pairing mode when not connected via USB and not already connected to a Bluetooth device.
  • Flashing LED = Bluetooth not connected, pairing.
  • Full brightness = Bluetooth connected.
     
4

Main Gain

 
Adjusts the overall volume in the software.
 
5

High EQ

 
Controls the treble frequencies for the individual channels.
 
6

Mid EQ

 
Controls the mid-range frequencies for the individual channels.
 
7

Low EQ

 
Controls the bass frequencies for the individual channels.
 
8

Filter

 
Adjusts the amount of the filter effect. Turning the knob left and right will produce a low-pass filter and high-pass filter, respectively.
 
9

Channel Volume Fader

 
Adjusts the volume of the individual channels in the software.
 
10

Crossfader

 
Controls the blend between the two decks.
 
11

PFL/Cue

 
Press this button to send this channel's pre-fader signal to the Cue Channel for monitoring. When engaged, the button will be lit. Press one PFL button at a time to cue that channel alone and deactivate PFL monitoring for the other channels.
 
12

Cue Level

 
Adjusts the volume for headphone cueing in the software.
 
13

Platter/Jog Wheel

 
This capacitive, touch-sensitive jog wheel controls the audio when the wheel is touched and moved. To bend the pitch of the track, grab the non-touch-sensitive outer wheel.
 
14

Fade FX

 
Press this button to activate the Fade FX feature in your DJ software. When Fade FX is active, moving the crossfader away from the current deck will apply the available Fade FX.
 
15

Pitch Fader

 
This controls the speed of the music. Moving towards the “+” will speed the music up, while moving towards the “” will slow it down.
 
16

Beat Align Forward Indicator

 
This LED indicates that the wheel needs to be nudged forward to align with the beat grid of the adjacent deck.
  • Off = Beat grid center or reverse is active.
  • Full brightness = Beat grid forward is active.
     
17

Beat Align Center Indicator

 
This LED indicates that the beat grid of both decks is aligned.
  • Off = Beat grid forward or reverse is active.
  • Full brightness = Beat grid center is active.
     
18

Beat Align Reverse Indicator

 
This LED indicates that the wheel needs to be pulled backward (reverse) to align with the beat grid of the adjacent deck.
  • Off = Beat grid center or forward is active.
  • Full brightness = Beat grid reverse is active.
     
19

Sync

 
Press this button to automatically match the corresponding Deck's tempo with the opposite Deck's tempo and phase.
 
20

Cue

 
When the Deck is paused, set a Temporary Cue Point by moving the Platter to place the playhead at the desired location and then pressing the Cue button.
During playback, press the Cue button to return the track to this Temporary Cue Point. If a Temporary Cue Point was not set, then it will return to the beginning of the track.
Track Beginning: Press and hold MODE/SHIFT and press this button to return the current track to its beginning.
Load Previous Track: If the play head is at the start of the track, press and hold MODE/SHIFT and press this button to load the previous track in the current list.
 
21

Play/Pause

 
Starts and suspends playback.
 
22

Performance Pad

 
These pads can be used to trigger Hot Cues, Loops, Samples, Stems, and to apply effects. To change the function of the pads, press the Mode button.
 
23

Pad Mode Indicator

 
These LEDs indicate the current setting of the Performance Pads.
 
24

Mode/Shift

 
Press this button to change the current function of the Performance Pads. Hold this button and press a pad to perform its SHIFT function.
  • Hot Cue: Each pad assigns at Hot Cue Point, or returns the track to that Hot Cue Point. When a pad is unlit, you can assign a Hot Cue Point by  pressing it at the desired point in your track.
    Delete Hot Cue: Press and hold MODE/SHIFT and press a pad to delete the hot cue.
  • Loops: Each pad triggers and auto-loop of a different length.
  • Effects: Each pad triggers a software effect for the current deck.
  • Samples: Each pad triggers a sample in your DJ software
  • Stems: Each pad triggers a stem.
Shift: Press and hold this button to access SHIFT functions.

 
25

Acapella

 
Press this button to activate an instant acapella from the loaded track.
 
26

Instrumental

 
Press this button to activate an instant instrumental from the loaded track.
 
27

Main Output

 
Use the included 1/8" to RCA adapter for RCA cables to connect this output to speakers or an amplifier system.
 
28

Headphone Output

 
Connect headphones to this 1/8” (3.5 mm) output for monitoring the signal. The headphone volume is controlled using the Cue Gain knob.
 
29

USB-C Port

 
This USB connection sends and receives audio and control information from a connected computer, tablet, or smartphone.
 
30

Party Ball Mode

 
Press this button to cycle between the different lighting modes for the Party Balls.
  • Color-controlled
In this mode, you can select from three lighting control patterns in your DJ software.
  • Beat-controlled
  • Fixed-timing random
  • All on
  • Off
     
31

Party Balls

 
When activated, these lights will illuminate according to the current Party Ball Mode setting.